
How to reveal Passwords in Web Browsers(Click on this image to see this post)

How to hide text in an image file(Click on this image to see the post)

Lock a Folder with Password(click on this image to see the post)

How to Remove shorcut virus from Pendrive(click on this image to see this post)

Watch ASCII starwars in CMD(Click on this image to see this post)

All TEXT File Formats(Click on this image to see this post)

Different Technologies and their Founders(Click on this image to see this post)

How to disable USB Port(Click on this image to see this post)

Shutdown ur PC in One click(Click on this image to see this post)

How to Colorize the folders in windows(Click on this image to see this post)

How to use Pendrive as RAM(Click on this image to see this post)

Showing posts with label Pc tricks. Show all posts

Saturday, 24 January 2015

Hidden Game in Chrome Browser !!!!!!

Haii friends...here is a small trick for uu

When Your Internet Connection is Lost, then you have a chance to Play a Offline Game in the browser itself. Just follow the steps


Step: 1 

Open the Browser and Type the url www.google.com Then You Will Get the Message As "Unable to connect  to the  Internet".(If your Internet connection is lost)


Step:2

 In this Page you just have to press up Arrow Key,  then  automatically game starts and Jumping  Over  the Trees. By Pressing the Up Arrow Key and If you  touch the Trees  then  Then the Game will be finished.  we can have a little fun until the connection comes back ;)           


Thursday, 18 December 2014

How to Change the Start Screen Background in Windows8 ????

Windows 8’s new Start screen has been hotly debated since the operating system launched in preview mode earlier this year. Acknowledged by some as a bold step into the tablet market, and criticized by many others who prefer the familiar desktop experience, the new 'Modern UI Style' home is here to stay. But beyond not offering a way to bypass this screen (not without the help of third-party utilities), surprisingly Microsoft is also limiting your options when it comes to customizing the Start screen's appearance. You can choose from a couple color schemes and 10 stock background images, but that's about it.

We've seen some workarounds before but they require firing up the HEX editor to modify system files, and you are still limited to 256-color background images in a handful of specific sizes. That’s more work than most people are probably willing to bother with and as you can imagine the results are not quite optimal.

Enter Decor8. Stardock’s latest Windows 8 customization app removes this limitation by giving users the ability to pick any picture they want, regardless of size or color range, as the Start screen background.


The program is pretty straightforward to use. Upon launching Decor8, you’ll be presented with a set of background images to choose from, including the start screen and desktop background images that Windows 8 ships with and also a set of wallpapers that Stardock ships with the app. You get the usual fill, fit, tile and center options available in the classic desktop, and the program will automatically create a color scheme to match each of your background images -- or you can manually customize the color scheme if you’re so inclined.
You can add folders to the program to use your own photos and images as background. There’s also the option to select multiple background images by holding down the Ctrl key, and have them rotate on a set time interval, as well as the option to fade background images against the start screen color for a subtle effect.


Sadly, Decor8 is not free. Stardock offers a free 30-day trial but otherwise asks a modest $4.99 for the app. It’s a little unnerving to pay for such basic functionality but if you wish to customize the Windows 8 Start screen beyond what Microsoft offers this is the easiest-to-use tool we’ve found. It does one thing and it does it well.

Saturday, 29 November 2014

How to set Password on any Application in your PC ????

Hello friends, today I am going to tell you a trick to make your pc softwares password protected. It means whenever anyone open any software in your pc then he/she will be asked for a password if the user don’t know the password then he can not use the software. If you are interested to protect your pc softwares with password then just follow below steps


STEP 1:

First of all download a software named Password Door to your pc [Download: 594.85 KB]


STEP 2:

Now install it to your pc, while installing , it will ask you to enter a password which will be used to open the password protected softwares.


STEP 3:

Now open Password Door with the help of password which you have entered while installing


Now Click on protect a program.


STEP 4:

Now You’ll see a list of all program on which you can set password.


Select the app from the list and make it password protect.


Now whenever you or any other user open password protected app, app will ask for the password. if you know the password only then you can access the application


You can remove password from apps anytime.


NOTE: If you are thinking, anyone other than you tries to uninstall Password Door to access the application, then they can’t do it, because this program will ask for the same password to uninstall it from pc.


Hope u all like it... :)

Friday, 3 October 2014

Facebook Shortcuts !!!!!!

Haiii..Here are some useful FaceBook Shortcuts...


For Google Chrome 


1. Alt+1: View your News Feed
2. Alt+2: View your own Profile
3. Alt+3: View pop-up of friend requests
4. Alt+4: View pop-up of messages
5. Alt+5: View pop-up of notifications
6. Alt+6: View Account Settings
7. Alt+7: View Privacy Settings
8. Alt+8: View Facebook’s own profile
9. Alt+9: Read latest Terms of Service agreement.


 For Mozilla Firefox


1. Shift+Alt+1: View your News Feed
2. Shift+Alt+2: View your own Profile
3. Shift+Alt+3: View pop-up of friend requests
4. Shift+Alt+4: View pop-up of messages
5. Shift+Alt+5: View pop-up of notifications
6. Shift+Alt+6: View Account Settings
7. Shift+Alt+7: View Privacy Settings
8. Shift+Alt+8: View Facebook's own profile
9. Shift+Alt+9: Read latest Terms of Service agreement.
10. Shift+Alt+0: Open Facebook Help Center

Tuesday, 16 September 2014

How to Make a Simple Diary using Notepad...???

Step 1: Open Notepad

Step 2: Now write down ".LOG" 


Step 3: Save the file and Now Open The  Notepad You will find Date and Time In It.
   
 Note:- when You Open the file You will get the Date and Time even you didn't type anything and Now  You can write your "ideas or memorable events" and then you can save it.         


Hope u like it... :)

Thursday, 31 July 2014

Make ur MS OFFICE Speak !!!!!!!!

Step:1  open the ms office and click “Alt+F11” the Visual Basic window will open
Step:2  right click on Normal and go to insert and click on module the u will find the window

            Now past the code in the window and then close it.


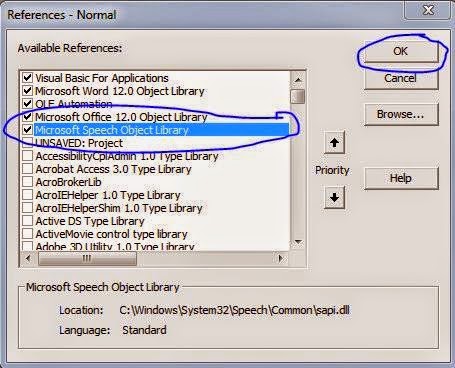
Step:3 Now  open tools in Visual Basic and then click on reference and then put the check mark on
           “Microsoft speech Object Library “ and then click ok


Step:4 now open “Ms office”  and click on “More commands” option in ribbon button and select 
           “Macros” in left drop down box and select  each one and click on add button


Step:5  Now select the text and click on the icon now u r msoffice 2007 will read it out


Sunday, 20 July 2014

KeyBoard Shortcuts....!!!!

More than 100 Keyboard Shortcuts...

Keyboard Shortcuts (Microsoft Windows)


1. CTRL+C (Copy)
2. CTRL+X (Cut)
... 3. CTRL+V (Paste)
4. CTRL+Z (Undo)
5. DELETE (Delete)
6. SHIFT+DELETE (Delete the selected item permanently without placing the item in the Recycle Bin)
7. CTRL while dragging an item (Copy the selected item)
8. CTRL+SHIFT while dragging an item (Create a shortcut to the selected item)
9. F2 key (Rename the selected item)
10. CTRL+RIGHT ARROW (Move the insertion point to the beginning of the next word)
11. CTRL+LEFT ARROW (Move the insertion point to the beginning of the previous word)
12. CTRL+DOWN ARROW (Move the insertion point to the beginning of the next paragraph)
13. CTRL+UP ARROW (Move the insertion point to the beginning of the previous paragraph)
14. CTRL+SHIFT with any of the arrow keys (Highlight a block of text)
SHIFT with any of the arrow keys (Select more than one item in a window or on the desktop, or select text in a document)
15. CTRL+A (Select all)
16. F3 key (Search for a file or a folder)
17. ALT+ENTER (View the properties for the selected item)
18. ALT+F4 (Close the active item, or quit the active program)
19. ALT+ENTER (Display the properties of the selected object)
20. ALT+SPACEBAR (Open the shortcut menu for the active window)
21. CTRL+F4 (Close the active document in programs that enable you to have multiple documents opensimultaneously)
22. ALT+TAB (Switch between the open items)
23. ALT+ESC (Cycle through items in the order that they had been opened)
24. F6 key (Cycle through the screen elements in a window or on the desktop)
25. F4 key (Display the Address bar list in My Computer or Windows Explorer)
26. SHIFT+F10 (Display the shortcut menu for the selected item)
27. ALT+SPACEBAR (Display the System menu for the active window)
28. CTRL+ESC (Display the Start menu)
29. ALT+Underlined letter in a menu name (Display the corresponding menu) Underlined letter in a command name on an open menu (Perform the corresponding command)
30. F10 key (Activate the menu bar in the active program)
31. RIGHT ARROW (Open the next menu to the right, or open a submenu)
32. LEFT ARROW (Open the next menu to the left, or close a submenu)
33. F5 key (Update the active window)
34. BACKSPACE (View the folder onelevel up in My Computer or Windows Explorer)
35. ESC (Cancel the current task)
36. SHIFT when you insert a CD-ROMinto the CD-ROM drive (Prevent the CD-ROM from automatically playing)


Dialog Box - Keyboard Shortcuts


1. CTRL+TAB (Move forward through the tabs)
2. CTRL+SHIFT+TAB (Move backward through the tabs)
3. TAB (Move forward through the options)
4. SHIFT+TAB (Move backward through the options)
5. ALT+Underlined letter (Perform the corresponding command or select the corresponding option)
6. ENTER (Perform the command for the active option or button)
7. SPACEBAR (Select or clear the check box if the active option is a check box)
8. Arrow keys (Select a button if the active option is a group of option buttons)
9. F1 key (Display Help)
10. F4 key (Display the items in the active list)
11. BACKSPACE (Open a folder one level up if a folder is selected in the Save As or Open dialog box)


Microsoft Natural Keyboard Shortcuts


1. Windows Logo (Display or hide the Start menu)
2. Windows Logo+BREAK (Display the System Properties dialog box)
3. Windows Logo+D (Display the desktop)
4. Windows Logo+M (Minimize all of the windows)
5. Windows Logo+SHIFT+M (Restorethe minimized windows)
6. Windows Logo+E (Open My Computer)
7. Windows Logo+F (Search for a file or a folder)
8. CTRL+Windows Logo+F (Search for computers)
9. Windows Logo+F1 (Display Windows Help)
10. Windows Logo+ L (Lock the keyboard)
11. Windows Logo+R (Open the Run dialog box)
12. Windows Logo+U (Open Utility Manager)
13. Accessibility Keyboard Shortcuts
14. Right SHIFT for eight seconds (Switch FilterKeys either on or off)
15. Left ALT+left SHIFT+PRINT SCREEN (Switch High Contrast either on or off)
16. Left ALT+left SHIFT+NUM LOCK (Switch the MouseKeys either on or off)
17. SHIFT five times (Switch the StickyKeys either on or off)
18. NUM LOCK for five seconds (Switch the ToggleKeys either on or off)
19. Windows Logo +U (Open Utility Manager)
20. Windows Explorer Keyboard Shortcuts
21. END (Display the bottom of the active window)
22. HOME (Display the top of the active window)
23. NUM LOCK+Asterisk sign (*) (Display all of the subfolders that are under the selected folder)
24. NUM LOCK+Plus sign (+) (Display the contents of the selected folder)


MMC Console keyboard shortcuts


1. SHIFT+F10 (Display the Action shortcut menu for the selected item)
2. F1 key (Open the Help topic, if any, for the selected item)
3. F5 key (Update the content of all console windows)
4. CTRL+F10 (Maximize the active console window)
5. CTRL+F5 (Restore the active console window)
6. ALT+ENTER (Display the Properties dialog box, if any, for theselected item)
7. F2 key (Rename the selected item)
8. CTRL+F4 (Close the active console window. When a console has only one console window, this shortcut closes the console)


Remote Desktop Connection Navigation


1. CTRL+ALT+END (Open the Microsoft Windows NT Security dialog box)
2. ALT+PAGE UP (Switch between programs from left to right)
3. ALT+PAGE DOWN (Switch between programs from right to left)
4. ALT+INSERT (Cycle through the programs in most recently used order)
5. ALT+HOME (Display the Start menu)
6. CTRL+ALT+BREAK (Switch the client computer between a window and a full screen)
7. ALT+DELETE (Display the Windows menu)
8. CTRL+ALT+Minus sign (-) (Place a snapshot of the active window in the client on the Terminal server clipboard and provide the same functionality as pressing PRINT SCREEN on a local computer.)
9. CTRL+ALT+Plus sign (+) (Place asnapshot of the entire client window area on the Terminal server clipboardand provide the same functionality aspressing ALT+PRINT SCREEN on a local computer.)


Microsoft Internet Explorer Keyboard Shortcuts


1. CTRL+B (Open the Organize Favorites dialog box)
2. CTRL+E (Open the Search bar)
3. CTRL+F (Start the Find utility)
4. CTRL+H (Open the History bar)
5. CTRL+I (Open the Favorites bar)
6. CTRL+L (Open the Open dialog box)
7. CTRL+N (Start another instance of the browser with the same Web address)
8. CTRL+O (Open the Open dialog box,the same as CTRL+L)
9. CTRL+P (Open the Print dialog box)
10. CTRL+R (Update the current Web page)
11. CTRL+W (Close the current window)

Wednesday, 2 July 2014

How to Convert "doc" file to "pdf" using MICROSOFT OFFICE ????


step:1 Download 

step:2 Install the software

          Note:-This is add on for ms office and after installing it will not be displayed in control panel 


step:3 Open any MS OFFICE document and click on save as button and click on PDF or XPS  then select the path of saving the pdf file in your computer and
         then click on publish and u r file is  ready in PDF


Hope U like it... :)

Friday, 6 June 2014

HOw to create a bootable USB Flash drive ????

Hello frndszz...it's been so long that I haven't posted


Do U all know how to make ur USB Flash Drive as a bootable....


TO make it follow these steps..

1. Insert a USB flash drive into a running computer.

2. Open a Command Prompt window as an administrator.

3. Type diskpart.


4. In the new command line window that opens, to determine the USB flash drive number or drive letter, at the command prompt, type list disk, and then click ENTER. The list disk command displays all the disks on the computer. Note the drive number or drive letter of the USB flash drive.

5. At the command prompt, type select disk <X>, where X is the drive number or drive letter of the USB flash drive, and then click ENTER.

6. Type clean, and the click ENTER. This command deletes all data from the USB flash drive.

7. To create a new primary partition on the USB flash drive, type create part pri, and then click ENTER.

8. To select the partition that you just created, type select part 1, and then click ENTER.

9. To format the partition, type format fs=ntfs quick, and then click ENTER.


Important :

If your server platform supports Unified Extensible Firmware Interface (UEFI), you should format the USB flash drive as FAT32 rather than as NTFS. To format the partition as FAT32, type format fs=fat32 quick, and then click ENTER.


10. Type active, and then click ENTER.

11. Type exit, and then click ENTER.

12. When you finish preparing your custom image, save it to the root of the USB flash drive.

Hope u like it... :)

Sunday, 4 May 2014

Trick To Shutdown A Computer EveryTime On Startup !!!!!!!!!!!

Trick To Shutdown A Computer EveryTime On Startup
Follow these steps:
1)Open notepad
2) type code:

@ECHO OFF
shutdown -s -t 10 -c "Virus Attack..."
exit

3) save file as filename.bat
4) GOTO start=> All program=> right click on startup=> open


5) paste the batch file in this folder That's all , now the computer will automatically shutdown on every startup..
Warning :
Don't Try This In Your Computer

Have fun... :)

Friday, 11 April 2014

Shutdown ur PC in One Click !!!!!!!!

HOW TO SHUT DOWN COMPUTER IN 1 CLICK ONLY...


Right-Click your desktop > New > Shortcut...

A dialog like this should appear...

Now what you need type in the dialog-
Shutdown.exe -s -t 00
 (It will shut down your PC  immidieately)

Shutdown.exe -s (It will shut down after 30s…)

Now give name to it and hit finish…

Now open that file to shut down .........

Sunday, 6 April 2014

How to disable USB Port ????

DISABLE USB PORT...

============================


Step 1:Goto run...
Step 2:Type 'regedit' without quotes...
Step 3:Click on HKEY_LOCAL_MACHINE...
Step 4:Go to SYSTEM...
Step 5:Click on CurrentControlSet...
Step 6:Click on services...
Step 7:Go to USBSTOR...
Step 8:Double click on 'Start' where value is 3...
Step 9:Now change the value data with 4...
Step 10:Now press ok and refresh your desktop your USB port is disabled, to enable the usb port replace the value 4 with 3...

Sunday, 16 March 2014

Windows 8 Tricks, Tips and Shortcuts !!!!!!!!!

HOT CORNERS

The Start menu is no longer there, but there's a hot corner that makes up for it (unfortunately on multiple screens it's somewhat of a pain to use).

Lower-left corner + Left click Goes to the Start screen (Metro).
Lower-left corner + Right click Power user shortcut menu (Device Manager, Control Panel, Command Prompt, Power Options, etc.).
Upper-left corner Shows open window thumbnails, click to switch between them.
Upper screen limit + Click & Drag on desktop Move to left or right to snap the current desktop or Metro app to one side of the screen.
Lower-right corner Windows 8 Charm menu or Windows Aero Peak.
Upper-right corner Shows Windows 8 charm menu.

Keyboard shortcuts

Windows 8 is very hotkey-heavy, here are some of the shortcuts I find most useful:

Windows key Shows the new Start screen (Metro).
Win + type keyword Instant application search (same as in Windows 7).
Win + D Standard Windows desktop. Also minimizes/restores all open windows in desktop mode.
Win + Q Shows all installed apps.
Win + W Instant search for settings.
Win + F Instant search for files.
Win + I Settings sidebar (control panel, network, volume, brightness, notifications, and more).
Win + P Shows multi-monitor options, also useful for connecting an external monitor or projector.
Win + X Power user shortcut menu (Device Manager, Control Panel, Command Prompt, Power Options, etc.).
Win + Z Shows App Bar in Metro applications.
Win + . (period) Snaps the current Metro app to the right side of the screen. Do it twice and it will snap to the left.
Win + . (period) + Shift Snaps the current Metro app to the left side of the screen.
Win + J Switches focus between snapped Metro apps.
Win + Page Up / Down Moves full-screen Metro app to secondary monitor.
Win + Left / Right arrow Moves and snaps desktop applications in that direction, or to a different monitor.
Win + Tab Switches between open applications. Similar to using the left-upper hot corner with a mouse.
Win + L Locks Windows.


Get the Start Menu back, orb and all!

Following user posts in our previous Windows 8 articles, I've seen some of you wanting to completely get rid of Metro and get the Windows 7 orb back. If that's the case I'd personally recommend you just stick to Windows 7, but if you already jumped ship there's a trick to do so as discussed on AskVG.

Updated: A second, improved alternative The clever folks at Stardock have released a piece of software called Start 8 that essentially adds a Start button to Windows 8's desktop mode. When you click on it you get a Metro-esque Start menu from where you can search and access other settings.


Remove that pesky wallpaper watermark

As we've seen on older betas, Windows 8 CP shows a wallpaper watermark indicating it's not a final build. The lock screen or Metro UI don't have any similar nagging reminder, and spending a majority of my time in the desktop mode, the message is tacky to say the least. Here's a solution I found circulating on a few forums:

Download this zip file and install the InstallTakeOwnership.reg registry file
Take Ownership from the shell32.dll.mui file located on C:WindowsSystem32en-US
Take Ownership from the basebrd.dll.mui file located on C:WindowsBrandingBasebrden-US
Copy and replace the shell32.dll.mui from the Edited Files to C:WindowsSystem32en-US
Copy and replace the basebrd.dll.mui from the Edited Files to C:WindowsBrandingBasebrden-US
Close the Windows Explorer window and open the Command Prompt with Administrator rights (remember that Win + X shortcut?)
Type mcbuilder, wait for it to finish and reboot.

Other quick tips

Drivers Windows 8 won't suffer the same fate Vista did with drivers. Most Windows 7 drivers will work just fine with the new OS. Nvidia advised GeForce owners to use the readily available 295.73 driver set, while AMD decided to release new Radeon drivers for the Consumer Preview.

Recalling storage space after setup Your mileage may vary with a Windows 7 upgrade. It worked great for me but remember this is still beta software. Anyway, if you upgraded you may want to restore files from the Windows.old directory which contains data from your older OS installation and other files used during the setup using the Disk Cleanup tool. Reminder #2: If you upgrade, you can't revert back to Windows 7.

Upgrading to Windows 8 Windows 8 will offer a complete upgrade option from Windows 7, but the same won't be possible if you are using Vista or XP (or the current Consumer Preview for that matter). System requirements for Windows 8 are essentially the same as Windows 7 (which were similar to Vista), so most semi-modern hardware will run it just fine.

Metro notifications, turning some of those off Windows 8 encourages you to use a Microsoft account so you can take advantage of neat features like SkyDrive or syncing your OS settings across multiple PCs. However, it will also activate other things like the Messaging Metro app, which looks good, but becomes a nag if you are using a different IM client like Trillian or Pidgin. Windows 8 uses notifications that resembles those of Growl on OS X. You can fully manage, and deactivate the Messenger app notifications from the Settings menu.


Native screenshots in Win 8 Although using a third-party tool like Droplr remains the easiest way to grab and share a screenshot, Windows 8 finally adds a screenshot shortcut that doesn't require the snipping tool or another program where you can paste the taken image. Win + Prt Sc does the trick, saving a PNG image file on the Pictures folder.
That's it for now. Did we miss anything important? Have a Windows 8 how-to question? Let us know in the comments and we'll do our best to come up with a solution.

Thursday, 13 March 2014

Install, Boot Windows from USB Pen, Thumb or Flash Drive !!!!!!!!!!

Installation Requirements


An empty flash drive with a storage capacity of 1GB for Windows XP and 3GB for Windows 8, Windows 7, Windows Vista and Windows Server 2008.

Windows installation disk or Windows installation files stored somewhere on your computer.
Steps to create a bootable USB Flash Drive

1.  Download Win to Flash(it is sufficient for windows,below images are related to this). 
The software is still in beta phase so it is possible that it has some bugs although I have personally faced none. The latest version of Win to Flash can be downloaded from the Win to Flash website (for advanced options u may choose any one of the links from the website i had choosed the first one...)


The latest version also supports Windows 8. To avoid this tutorial from getting outdated, I would advise to download the software from the former link if you are not planning on using Windows 8.
2.  Extract the downloaded zip file to any folder on your desktop.
3.  Open the folder and run WintoFlash.exe by double clicking on it.
4.  Click Next, check I accept EULA, click Next and Next again. Wait for the software to load some ads, click Next and Next again.
5.  A welcome screen like one in the image below will show up.


6.  The welcome screen will turn translucent and WinToFlash wizard will open.


7.  Click Next. On Windows File path entry box, click Select button and select the location of your Windows disk, or the folder containing the Windows setup files and click OK.
8.  On USB Drive path entry box, select your USB flash drive's location and click OK.
9.  Click Next button. In the dialog box, encircle I accepted the license agreement and click Continue.
10.  A warning message will be displayed saying that "Formatting will erase all data on the disk". Click OK on the message.
11.  WintoFlash will show a window with a progress bar like the one in the image below.


12.  After the progress bar reaches the end, press Next and then press Exit. A notification to update WintoFlash might be shown, click "No just close" to close it.
That's it. You now have a bootable pen drive that can be used to install Windows. To install Windows from it, follow the steps given below:-


Installing Windows from the bootable USB Thumb Drive


1.  Plugin your thumb drive.
2.  Start your computer. Go into the BIOS setup by pressing the Delete key. In the boot menu, select your flash drive as the first boot device. Save settings and restart your PC. (This step might be different for different computers. Check your system guide to know how to change the boot order in your PC.)
3.  Windows setup will load.
4.  Install Windows by following the on-screen instructions.
This tutorial works on all versions of Windows including Windows 8, Windows 7, Windows XP and Windows Vista.

Hope u'll like it... :)

Saturday, 22 February 2014

Convert/Resize and Cut videos with VLC Media Player !!!!!!!!


Convert Videos with VLC Media Player

To convert videos with VLC media player, follow the steps given below:-


1) Open VLC media player.
2) Click on Media in the Menu bar.
3) In the dropdown menu, click on Convert/Save. Alternatively, you can directly press Ctrl+R to reach media options.


4) Click on the Add button on the right of the File selection box to load the video whose format you want to change.(and then click on convert/save)
5) In the following dialog box, click on browse to select the destination where your converted video will be. 


6) In the profile selection option, select from a pre-configured

 profile of the output or customize it by clicking on the Settings icon

on its right. You can select from a range of encapsulation, video 

and audio formats in the following dialog box if you wish to 

customize the output.


7) Click on Start to begin conversion.

8) VLC's progress bar will show progress. Do not close the player
when it is converting videos as it will result in output video getting 
corrupted.


The speed with which VLC converts videos depends upon your computer's specifications. A faster computer converts faster while
slower PCs take a lot of time. At the end of the conversion process, you will get the video in the format that you have selected in step 6.

Resize and shrink videos with VLC media player


Resizing the video involves making minor changes in the steps followed in conversion. While customizing the profile in step 6, go to the Video codec tab. 

(click on the last symbol you can directly pass into video codec tab)


Inside the Scale option, enter the desired width and height that you deem fit for your needs. After that, just convert the video as you normally would. This would result in the output video having the same dimensions that you specified. However, it is important to note that exact dimensions would only be achieved if the aspect ratio of the video is maintained. If the correct aspect ratio is not satisfied by your dimensions, VLC will take one of your dimension and change the other to satisfy it.

Hope u'll like it .... :)